Canadian Park’s Service Celibrates 100 Years – Way to go gang

Not much to say here except HOORAY.

http://www.pc.gc.ca/progs/celebrations/index.aspx

Come Celebrate!

Come Celebrate! Come Celebrate!
© Parks Canada

Experience the unforgettable as you join in the celebrations of the centennial of Parks Canada, the world’s first national parks service! Throughout the country and throughout the year, Canada’s historic and natural treasures are hosting special programs and activities put on to celebrate this special anniversary.


Theme Months
November 2011
Partners and supporters

Centennial Events

Centennial Events

Centennial Booklet

Centennial Booklet – Our Story

To keep up with all that’s going on and to not miss anything, follow us on Twitter, “Like” us on Facebook and come back to this site frequently!

Date Modified 2011-11-03

:}

More tomorrow.

:}

Do Not Put It Off – Weatherize today

This says it all. Quite frankly all this stuff keeps you cool in the summer as well.

http://homerepair.about.com/od/exteriorhomerepair/ss/winterize.htm

Easy Home Winterizing Checklist

By , About.com Guide

In the fall is when you want to get ready for the winter cold. The worst thing in the world is trying to put your storm windows in when its 20 degrees outside. Or worse, not having your sprinkler system purged before the freezing weather comes.I’m going to give you a fairly easy checklist of things to do for the various systems of your home. From plumbing to roof, we’ll walk through each system and hit the major things to make sure you do before winter so you can enjoy the snow and not worry about your home.
OK, lets start with the basics of making sure you have heat when you need it. The time to check that is in the Fall, no later than the end of October. Give your system a test run through and make sure all systems are “GO“.

Heating System Checklist

  • Test Run:
    Turn the thermostat to heat mode and set it to 80 degrees just for testing. You should hear the furnace turn on and warm air should blow within a few minutes. If it’s running OK, turn the thermostat back to its normal setting. If it’s not running properly, you can try to diagnose it as outlined in Troubleshooting a Gas Furnace. Depending on what’s wrong, you can fix it yourself or you may need a qualified service technician.
  • Seasonal Maintenance:
    Either have the furnace checked by a service technician or do it yourself as outlined in Seasonal Furnace Maintenance.
  • Replace the Air Filter:
    Put in a new clean air filter. It’s easy, just follow the steps in Furnace Filter Replacement
  • Fuel:
    If you have a propane or oil furnace, make sure to have your fuel storage tank topped off and ready to go.
  • Heating Vents:
    Clear obstacles to heating vents so air can freely flow.
  • Check for Carbon Monoxide Leaks:
    This silent killer can easily be detected with either an inexpensive test badge or battery operated alarm. Whichever way you decide, just please decide to protect your family with one of these units.
    See Testing for Carbon Monoxide for more information.

:}

This is 2 pages out of 10. Please go there and read the rest. New topic next week.

:}

Weatherizing Your Home – So much to do so little time

More tips today and tomorrow. Then we move on.

http://life.gaiam.com/article/top-5-places-top-25-ways-weatherize-your-home

Top 5 Places & Top 25 Ways to Weatherize Your Home

Excerpted from the Solar Living Sourcebook by John Schaeffer. See the book for a helpful cutaway illustration pointing out 42 places to weatherize that are discussed in this weatherization article.

Short of printing your own money, weatherization and insulation are the best bets for putting cash in your wallet — and they’re a lot safer in the long run than counterfeiting. Weatherization, the plugging and sealing of air leaks, can save you 25 to 40 percent on your heating and cooling bills.

The average unweatherized house in the United States leaks air at a rate equivalent to a four-foot-square hole in the wall. Weatherization is the first place for the average home owner to concentrate for the most benefit with the least effort and expense. You’ll save money and help the planet!

The following suggestions are adapted with permission from Homemade Money by Richard Heede and the Rocky Mountain Institute.

1. In the attic

  • Weatherstrip and insulate the attic access door.
  • Seal around the outside of the chimney with metal flashing and high-temperature sealant such as flue caulk or muffler cement.
  • Seal around plumbing vents, both in the attic floor and in the roof. Check roof flashings (where the plumbing vent pipes pass through the roof) for signs of water leakage while you’re peering at the underside of the roof.
  • Seal the top of interior walls in pre-1950s houses anywhere you can peer down into the wall cavity. Use strips of rigid insulation, and seal the edges with silicone caulk.
  • Stuff fiberglass insulation around electrical wire penetrations at the top of interior walls and where wires enter ceiling fixtures. (But not around recessed light fixtures unless the fixtures are rated IC [for insulation contact]). Fluorescent fixtures usually are safe to insulate around; they don’t produce a lot of waste heat. Incandescent fixtures should be upgraded to compact fluorescent bulbs).
  • Staple Radiant Barrier under the rafters or joists to reflect 97 percent of the radiant heat that strikes it
  • Seal all other holes between the heated space and the attic.

:}

Go there and read the other 4 sections. More tomorrow

:}

This Piece On Weartherproofing Is Pretty Good – But I am skipping all of the types of caulk

Look  just buy good caulk. That is it. Nothing lasts for 25 years so do not believe that. Usually caulk lasts for six or seven years. That’s it. So do not pay 6 $$$ per tube. But, if you pay 3 or 4 $$$ you are in the right range. If you can get that exact same type of caulk on sale all the better.

http://alsnetbiz.com/homeimprovement/info10.html

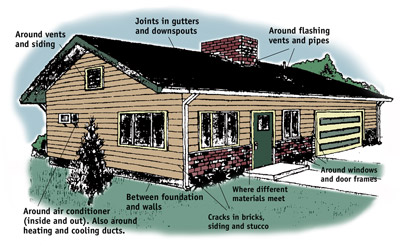
The average house–even when well-insulated–contains cracks and gaps between building materials that add up to a hole about 14 “square (Fig. 1). In the winter, those gaps may make the house drafty and chilly. All year long, a leaky house not only wastes energy, but can lead to water damage and provide a path for insects. Inside this document you will find information about: 
  • Weatherproofing Basics
  • Types of Caulking
  • Using Caulking
  • Types of Weatherstripping
  • Installing Weatherstripping

WEATHERPROOFING BASICS

  • In all the discussion of insulation and R-values, don’t forget that poor weatherproofing is often a more important source of discomfort, as well as high heating and cooling bills. 

  • Some air leakage can be prevented during construction by using housewrap or getting a tight fit between framing members, for example. Once the house is built, however, the remaining gaps must be sealed. Gaps around doors and window sashes should be weatherstripped, and gaps between permanent building materials sealed with caulking.


FIG. 1 – Where caulking should be applied, from the Sunset book, Insulation and Weatherstripping, © Sunset Publishing Corp.

TYPES OF WEATHERSTRIPPING

  • The greatest source of air leakage in most homes occurs around doors, windows, and access hatches, such as the ceiling opening from the living area into an unheated attic (Fig. 4). Weatherstripping can be a delicate job because those openings need to be fitted loosely enough that the door or window operates freely, yet tightly enough that air leakage is stopped. 

  • The type of weatherstripping you’ll use depends on the location and the type of opening. Three types of weatherstripping are common: 

  • Compression–Compression weatherstripping (Fig. 5) is used to seal swinging doors and window sashes. It consists of a molded strip (it may be wood, aluminum or rigid vinyl) with a flexible vinyl bulb along one side. As a rule, compression weatherstripping is the most durable type available. 

  • V-Type Strips–V-shaped weatherstripping (Figs. 6 & 7) is fitted against the side of the door or window jamb so it presses against the edge of the door or sash and forms a seal. V-stripping may be vinyl or bronze. 

  • Foam–Foam weatherstripping (Fig. 8) is used to seal either swinging or sliding doors or windows. It comes in various sizes with an adhesive backing on one side. It is fastened to the edge of a door or window stop, or to the bottom of a sliding window sash. 

  • Thresholds and Door Bottoms–A threshold fills the gap between the floor and the bottom of a door. It may have a built-in vinyl bulb. If not, it must be used in combination with a door bottom (Fig. 9), mounted on the lower edge of the door.


:}

So if you want to read about all that caulk or look at the pretty pictures about how to install weather stripping. Please go to the sight and look. More tomorrow.

:}

Weatherization Is The Next Big Thing – At least according to this author

I hope this comes true.


http://news.cnet.com/8301-11128_3-10150977-54.html

Weatherizing homes: The next big green industry?

by January 28, 2009 4:00 AM PST
..

It’s not the sort of thing that excites your typical Silicon Valley venture capitalist, but companies that weatherize homes could be the sleeper green-business success stories this year.

Many people would like to lower their household energy bills but need an expert to recommend what steps to take as part of a long-term plan.

There’s also a substantial amount of government support for energy-efficient retrofits, including from President Obama who has set a target of lowering utility bills at 2 million homes. The federal stimulus plan now being debated in Washington, D.C., sets aside $6 billion to weatherize low-income homes.

At the local level, too, municipal governments and nonprofits see home energy use as one the most important ways to meet greenhouse gas emission reduction goals, said Geoff Chapin, CEO of Boston-based Next Step Living, which provides energy auditing services.

“This is a tremendous time to be in the field,” he said. “Cities and towns care about creating jobs that can’t be outsourced and reducing their carbon footprint and saving people’s money, so it has a lot of support.”

Chapin founded the energy-services company last year and has weatherized more than 100 homes. A former consultant for cities and nonprofits, he founded the business in an effort to cut residential energy bills, lower greenhouse gas emissions, and create jobs.

A blower door is a removable door with fan and computer to measure air flow. There are already free home energy efficiency services. Paid services from companies like Next Step Living typically use diagnostic equipment, notably a blower door, to spot holes where heated or cooled air slips outside. (Full disclosure: I’ve signed on as a customer and am expecting my first visit soon.)

:}

More next week.

:}

Ace Is The Hardware Place – This post is mainly about filling cracks

If you are letting cold air in then you are wasting money. Calking is the quickest way to stop that.

http://www.acehardware.com/info/index.jsp?categoryId=1282811

The average house-even when well-insulated-contains cracks and gaps between building materials that add up to a hole about 14 inches square (see image below). In the winter, those gaps may make the house drafty and chilly. All year long, a leaky house not only wastes energy but can lead to water damage and provide a path for insects.

Inside this document you will find information about:

  • Weatherproofing Basics
  • Types of Caulking
  • Using Caulking
  • Types of Weatherstripping
  • Installing Weatherstripping

WEATHERPROOFING BASICS

  • In all the discussion of insulation and R-values, don’t forget that poor weatherproofing is often a more important source of discomfort, as well as high heating and cooling bills.
  • Some air leakage can be prevented during construction by using housewrap or getting a tight fit between framing members, for example. Once the house is built, however, the remaining gaps must be sealed. Gaps around doors and window sashes should be weatherstripped, and gaps between permanent building materials sealed with caulking.

TYPES OF CAULKING

  • A number of factors must be considered when choosing caulking. They include durability, flexibility, whether the caulk can be painted and, of course, price.
  • The most expensive caulk is not always the best product for every job, so you should carefully consider which product is appropriate to your situation. Read product labels and manufacturers’ literature, and ask your salesperson for his or her recommendation.
  • Here is a list of common caulks and their characteristics. Different types of caulking are designed for different applications, and quality can vary among different brands of the same type because of different formulations used.
  • Always read and follow the manufacturer’s directions.
  • Oil-Base Painter’s Caulk (1-2 yr. life) – Not very elastic. Dries out easily. Paintable after curing. Lowest cost.
  • Latex (3-10 yr. life) – Use mostly indoors. Goes on easily. Low elasticity. Sticks to porous surfaces only. Easy water cleanup. Low in cost. Paintable.
  • Butyl Rubber (3-10 yr. life) – High elasticity. Sticks to most surfaces. High moisture resistance. Flexible when cured. Most difficult to work with as it is very sticky.
  • Acrylic Latex (10 yr. life) – Good elasticity. Sticks to most surfaces. Reasonable moisture resistance. Paintable. Good for around doors and windows. May not be used below freezing.
  • Silicon-Latex Blend (20+ yr. life) – Good elasticity. Excellent weathering ability. Medium shrinkage. Adheres to most surfaces. Some cannot be painted. May not be used below freezing.


:}

This is a really long piece so go there and read that. More tomorrow.

:}

Weather Proofing Or Weatherization – Doesn’t matter much

No matter what you call it, it is an attempt to keep the brrr and ssssiss factors at bay. In the Arctic and the Equator it would just be called staying alive.

http://en.wikipedia.org/wiki/Weatherization

Weatherization

Weatherization (American English) or weatherproofing (British English) is the practice of protecting a building and its interior from the elements, particularly from sunlight, precipitation, and wind, and of modifying a building to reduce energy consumption and optimize energy efficiency.

Weatherization is distinct from building insulation, although building insulation requires weatherization for proper functioning. Many types of insulation can be thought of as weatherization, because they block drafts or protect from cold winds. Whereas insulation primarily reduces conductive heat flow, weatherization primarily reduces convective heat flow.

In the United States, buildings use one third of all energy consumed and two thirds of all electricity. Due to the high energy usage, they are a major source of the pollution that causes urban air quality problems and pollutants that contribute to climate change. Building energy usage accounts for 49 percent of sulfur dioxide emissions, 25 percent of nitrous oxide emissions, and 10 percent of particulate emissions.[

Typical weatherization procedures include:

  • Sealing bypasses (cracks, gaps, holes), especially around doors, windows, pipes and wiring that penetrate the ceiling and floor, and other areas with high potential for heat loss, using caulk, foam sealant, weather-stripping, window film, door sweeps, electrical receptacle gaskets, and so on to reduce infiltration.
  • Sealing recessed lighting fixtures(‘can lights’ or ‘high-hats’), which leak large amounts of air into unconditioned attic space.
  • Sealing air ducts, which can account for 20% of heat loss, using fiber-reinforced mastic(not duck/duct tape, which is not suitable for this purpose)
  • Installing/replacing dampers in exhaust ducts, to prevent outside air from entering the house when the exhaust fan or clothes dryer is not in use.
  • Protecting pipes from corrosion and freezing.
  • Installing footing drains, foundation waterproofing membranes, interior perimeter drains, sump pump, gutters, downspout extensions, downward-sloping grading, French drains, swales, and other techniques to protect a building from both surface water and ground water.
  • Providing proper ventilation to unconditioned spaces to protect a building from the effects of condensation. See Ventilation issues in houses
  • Installing roofing, building wrap, siding, flashing, skylights or solar tubes and making sure they are in good condition on an existing building.
  • Installing insulation in walls, floors, and ceilings, around ducts and pipes, around water heaters, and near the foundation and sill.
  • Installing storm doors and storm windows.
  • Replacing old drafty doors with tightly sealing, foam-core doors.
  • Replacing older windows with low-energy, double-glazed windows.

The phrase “whole-house weatherization” extends the traditional definition of weatherization to include installation of modern, energy-saving heating and cooling equipment, or repair of old, inefficient equipment (furnaces, boilers, water heaters, programmable thermostats, air conditioners, and so on). The “Whole-House” approach also looks at how the house performs as a system

:}

More tomorrow.

:}

The Joys Of Fall Gardening – But how long does it last

So when to plant and when to harvest, that is the question? This information is for North Carolina but is probably applicable to all.

http://www.ces.ncsu.edu/depts/hort/hil/hil-8001.html

Table 1. Fall Vegetable Planting Guide.

Vegetables Suggested Planting1 Suggested Cultivars Inches Between Plants Planting Depth (inches) Cold
Tolerance2
Days to
Maturity
Asparagus (crowns) Nov. 15 to Mar. 15 Mary Washington, Jersey Giant, Jersey Gem 15 6.0 2 years
Beets July 15 to Aug. 15 Ruby Queen, Early Wonder, Red Ace, Pacemaker II 2 0.5 to 1.0 Semi-hardy 55 to 60
Broccoli July 15 to Aug. 15 DeCicco, Packman, Premium Crop, Green Duke, Emperor 18 0.5 to 1.0 Hardy 70 to 80
Brussels sprouts July 1 to 15 Long Island Improved, Jade Cross Hybrid 20 0.5 to 1.0 Hardy 90 to 100
Cabbage (plants) Aug 1 to 15 Round Dutch, Early Jersey Wakefield, Red Express, Red Rookie, Sweetbase 12 0.5 to 1.0 Hardy 70 to 80
Cabbage, Chinese Aug. 1 to 15 Pak Choi, Mei Ching, Jade Pagoda, China Pride 12 0.5 to 1.0 Hardy 75-85
Carrots July 1 to 15 Danvers Half Long, Spartan Bonus, Little Finger, Thumbelina, Scarlet Nantes 2 0.25 to 0.5 Hardy 85 to 95
Cauliflower Aug 1 to 15 Early Snowball “A”, Violet Queen, Snowcrown 18 0.5 to 1.0 Semi-hardy 55 to 65
Collards July 15 to Aug. 15 Vates, Morris’ Improved Heading, Carolina, Blue Max 18 0.5 to 1.0 Hardy 60 to 100
Cucumbers, pickling Aug. 1 to 15 Carolina, Calypso, Liberty (mtns.), County Fair ’83 10 1.0 to 1.5 Tender 40 to 50
Cucumbers, slicing Aug. 1 to 15 Poinsett 76, Sweet Slice, County Fair ’83, Salad Bush, Fanfare 10 1.0 to 1.5 Tender 40 to 50
Kale Aug. 15 to Sept. 1 Green Curled Scotch, Early Siberian, Vates, Dwarf Blue Curled Scotch, Blue Knight 6 0.5 to 1.0 Hardy 40 to 50
Kohlrabi Aug. 1 to Sept. 1 White Vienna, Grand Duke Hybrid 4 0.5 to 1.0 Hardy 50 to 60
Lettuce (leaf) Aug. 1 to Sept. 1 Grand Rapids, Salad Bowl, Buttercrunch, Red Sails, Romulus 6 0.25 to 0.5 Semi-hardy 40 to 50
Lettuce (head) Aug. 15 to 31 Great Lakes, Ithaca 10 0.25 to 0.5 Semi-hardy 70 to 85
Mustard Aug. 1 to Sept. 15 Southern Giant Curled, Tendergreen, Savannah 2 0.5 to 1.0 Hardy 30 to 40
Onions (seeds) Sept. 1 to 30 Texas 1015, Granex 33, Candy 4 0.5 to 1.0 Hardy 130 to 150
Onions (sets or plants) Sept. 1 to 15 Ebenezer, Excell, Early Grano 4 Hardy 60 to 80
Radishes Aug. 15 to Sept. 15 Early Scarlet Globe, Cherry Belle, Snowbells, White Icicle 1 0.5 to 1.0 Hardy 25 to 30
Radish, Diakon Aug. 15 to Sept. 15 April Cross, H. N. Cross 4 0.5 to 1.0 Hardy 60 to 75
Rutabagas July 1 to Aug. 1 American Purple Top, Laurentian 4 0.5 to 1.0 Semi-hardy 70 to 80
Spinach Aug. 1 to 15 Hybrid 7, Dark Green Bloomsdale, Tyee Hybrid 6 0.5 to 1.0 Hardy 50 to 60
Turnips Aug. 1 to 31 Purple Top White Globe, Just Right, Tokyo Cross Hybrid, White Egg, All Top 2 0.5 to 1.0 Hardy 55 to 60

Published by

North Carolina Cooperative Extension Service


Distributed in furtherance of the Acts of Congress of May and June 30, 1914. Employment and program opportunities are offered to all people regardless of race, color, national origin, sex, age, or disability. North Carolina State University at Raleigh, North Carolina A&T State University, U.S. Department of Agriculture, and local governments cooperating.


:}

More tomorrow.

:}

Worm Farms At Work – You can do it too

If your workplace has a cafeteria or a food service this is serious business and a potential money maker.

http://www.tri-cityherald.com/2009/04/09/538667/a-posting-about-composting-at.html

Welcome to Get Green, the Herald’s blog about making the newspaper more environmentally efficient and friendly. We offer some of our experiences about the challenges and successes of “greening” the Herald, as well as tips you can use at home. Questions? Comments? Got your own tip to share? Contact Eric Degerman via 509-582-1404 or edegerman@tricityherald.com.

A posting about composting at work

By Eric Degerman, sportstricities.com

I’m not so sure about bringing a case of worms to the office.

However, if it’s good enough for Gail Everett and the City of Richland, I’m game.

And I’ll it will serve as a test to see just how thoughtful my fellow employees at the Herald are.

Last month, I visited Gail — Richland’s environmental education coordinator — at city hall to talk about getting a compost bin started at Herald headquarters.

Lo and behold, she’s not the only one working in her small office. There are a bunch of happy worms dining on her discards of fruit.

With that inspiration, I’ll launch composting efforts at the Herald later this month. I need to acquire a suitable bin, then start creating a new home for some worms. Then, I believe Gail will be adopting out some of her “co-workers” for me to take to the Herald.

Ironically, these worms love newsprint. (Recycle your favorite newspaper joke here.)

— Eric Degerman is the Herald’s online managing editor who makes regular trips each year from Richland to Clayton-Ward in Kennewick so that he can exchange his household recyclables for money to buy beverages produced from Columbia Valley grapes and hops.

:}

Fall gardening next week.

:}

The Ultimate Frontier – Composting at work

Yesterday I posted about corporate recycling and how they have to have plastic containers with labels on them to actually do it. Well here is a thought. Take a felt tipped marker and cross out paper and write organics. That way you are composting at work. If you have no organics other than food scraps you may have to mix in some shredded paper or go out side and collect some leaves. You will need a a tight lid and you may need to store it outside, but everything is possible.

http://bubbler.wordpress.com/2007/08/20/composting-at-work/


Composting at Work

I’ve started a composting process of the food waste at my workplace using a bin that is passively aerated. It’s kind of a prototype, as I am figuring out what kind of mix of inputs will work, how much moisture it needs, etc. During the summer, our kitchen produces a huge amount of food scraps which gets bagged up, thrown into a room, then later heaved up by staff onto our dump truck, driven into town, dumped at the refuse center, where it is then sorted and transported out of the county to a landfill 70 miles away. It’s a ridiculously inefficient process of dealing with waste that generates yet more waste.

The small bin I have currently set up will fill up within a week, so obviously it isn’t anywhere near cutting much waste out. However, once I’ve demonstrated that it works and have figured out the proper mix and all that, I’m hoping that we can expand the operation to cut out a more significant chunk of waste.

The whole science and art of composting consists of a proper ratio of carbon to nitrogen, which ideally should be around 30:1. We have a vast amount of cardboard and newspaper on-hand which I will shred to serve as bulk carbon (further reducing the transport of those materials into the recycling center in town), as well as sawdust and, every now and then, pine needles. The food waste supplies the nitrogen, as well as moisture. I will also pick up horse manure from stables down the road and mix that in there as well to provide essential microbes. It remains to be seen what kind of compost such a mixture will produce—it may be somewhat deficient on nutrients as my main sources of carbon are bland.

:}

More tomorrow.

:}